
Hi loves! I know it has been a while since I posted on here and I am so sorry about that! My new job has been my priority the last few months, but now I’m back in full swing. I am kicking 2017 off with my first-ever makeup tutorial! I tried really hard to get this to work properly, but did run into some technical difficulties. That’s okay, though, because it’s all a learning experience, right? This tutorial features almost all Too Faced products and I’ve written about this look before in my Natural Glow Party Look post. I hope you enjoy the video and please subscribe to my channel!
Tag: benefit cosmetics
August Hits and Miss Video
Hi everyone! Hope you’re all having a fabulous Labor Day. Below you’ll find my August Hits and Miss video. If you like what you see, please subscribe to my channel, and stay tuned here on the blog, because I will be giving you a written tutorial on how I got the look I wore at my housewarming party last weekend!
Swamp Queen Palette | Tarte x Grav3yardGirl Summer Look
I finally got around to using my Swamp Queen, tarte x grav3yard girl palette over the weekend. It has been a while since I ordered it from Ulta, but I was wearing the right colors Saturday night to pair with an eye look. I also used some of my new ColourPop products, which I unbox in this video.
As you can tell from the hyperlink above, I started a new YouTube channel and am really excited about it! Please subscribe if you like Blush and Lipstick.
Here’s the look!

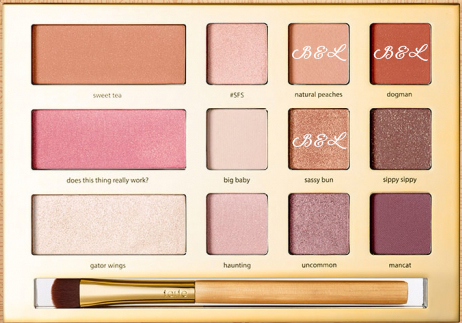
Palette photo courtesy of tarte cosmetics.
Face:
- Hangover Rx Primer by Too Faced
- Born This Way Foundation in Warm Nude by Too Faced
- Primed & Poreless loose powder by Too Faced
- Cocoa Foundation in Light/Medium by Too Faced
- Cocoa Contour Palette by Too Faced
- Super Cheek Shock in Aphrodisiac by ColourPop Cosmetics
- Super Cheek Shock (pearlized) in Butterfly Beach by ColourPop Cosmetics
Eyes:
I will provide a step-by-step application on how to get this eye look.
- Apply Urban Decay’s Eyeshadow Primer Potion (in original) on lid and a little above the crease.
- Using the Makeup Revolution Affirmation palette and a firm eyeshadow brush, I applied the matte white shade on my lid up to my brow bone.
- Taking a fluffy blending brush, I applied natural peaches from the Grav3yardGirl x Tarte Swamp Queen palette in my crease, blending up.
- Once I had the right color with natural peaches, i took a firmer blending brush and applied dogman in the crease, slightly below natural peaches, and in the outer “v” of the eye.
- Using the same firm eyeshadow brush I used to apply that white matte shade from the MR palette, I applied sassy bun on my lid, adding a little glam to the look.
- If needed, reapply natural peaches to the crease to soften the look a bit.
- Using a clean, fluffy blending brush, blend the crease up a little more to get rid of harsh lines.
- Liquid eyeliner in Jet Black by e.l.f cosmetics
- They’re Real mascara by Benefit Cosmetics
Lips:
- BFF pencil liner by ColourPop Cosmetics
- Melted Matte Liquified Liquid Lipstick in Child Star by Too Faced
If you like this look and want to see a tutorial of it on my YouTube channel, leave a comment below! Also, what looks have you created with the Swamp Queen palette by Grav3yardGirl x Tarte? I’d love to know.
Makeup Revolution and ColourPop
Now that I have my office/vanity room set up, I’ve been able to organize everything so it’s super accessible. Over the weekend I had to venture out for lunch in San Francisco and decided to play around with my new Makeup Revolution Affirmation palette. Super affordable, the colors are quite pigmented and who doesn’t love 32 shadows for $15. The look pictured below includes the affirmation palette, as well as ColourPop’s liquid matte lipstick in the color Trap. Read below to see how I got this look. If you’ve created a similar look, please let me know! I’d love to see it.

Face:
- Hangover primer by Too Faced
- Born This Way foundation in the color Warm Nude by Too Faced
- Born This Way concealer in the color Light by Too Faced (placed under the eyes, forehead, bridge of nose, cupid’s bow, chin and laugh lines)
- Primed & Poreless loose powder by Too Faced (placed wherever concealer was applied)
- Cocoa Powder Foundation in the color Light/Medium by Too Faced (stippled on and then blended out)
- Goof Proof Eyebrow Pencil in the color 04 Medium by Benefit Cosmetics
- Cocoa Contour palette by Too Faced
- Sweetheart Blush in Something About Berry by Too Faced
- Candlelight Glow highlight in the color Warm Glow by Too Faced
Eyes:

Affirmation palette image provided by Makeup RevolutionAffirmation palette image provided by Makeup Revolution
- Eyeshadow Primer Potion by Urban Decay (placed on lid up to brow bone)
- Affirmation Eyeshadow palette by Makeup Revolution (see image for step-by-step placement of color)
- Using a clean eyeshadow brush, place color A on lid up to brow bone.
- Using a clean blending brush, place color B in the crease, blending in windshield wiper motions. Blend color B into the outer “V” of the eye, placing a little on the outer corner of the eyelid.
- Using the same eyeshadow brush you used to apply color A, apply color C on the eyelid, covering any empty spots with color C. Apply color C on inner corners.
- If necessary, apply color B into the crease again to deepen the color.
- Using a clean fluffy blending brush, blend crease out so lines aren’t as harsh.
- Using either a clean eyeshadow brush or an eyeliner brush, apply color D to brow bone (under eyebrow) to highlight.
- Long-Wear Gel Eyeliner in the color jet black by Bobbi Brown
- They’re Real mascara by Benefit Cosmetics
Lips
- Lippie Stix Primer by ColourPop
- Ultra Matte Lip in the color Trap by ColourPop
- Melted Matte Liquified Lipstick in the color Miso Pretty by Too Faced (applied a few dots over Trap by ColourPop and blended to lighten the color a bit)
Setting Spray:
- All-Nighter Setting Spray by Urban Decay
Latest Ulta Haul: Urban Decay & Benefit
I am so sorry for the lack of posts lately. We bought a house and are in the process of packing up our apartment and moving things over. But I am excited for the new house since I’ll have my own beauty room and office! I will be starting a YouTube channel shortly after we move (and after I get everything set up), but in the meantime you can still follow me on Instagram, Twitter and Facebook.
Now to the post. About a week ago I placed an order on Ulta.com after they sent me an email that Benefit just launched their new brow collection online. I normally don’t do anything with my brows, but had heard great things about this new collection so I thought I’d give it a try. Loving the packaging for both Goof Proof Brow Pencil and KaBrow! I have yet to use it (I overslept this morning and barely made it out the door on time), and I’m excited to give my eyebrows a cleaner, less patchy look. Have you used these new Benefit brow items? I’d love to know. Since I purchased the Benefit items, they sent me a free variety pack. Love those items, too.

Also in my haul was another Urban Decay Vice lipstick. I have been obsessed with this collection since it first launched. This is the second lipstick I’ve purchased – I am obsessed with their comfort matte finish. The color I purchased this time around is called Unicorn and is a pale, peachy nude color. When I applied Unicorn today, it seemed brighter than what the shade looks like in the lipstick tube. To darken it up, I took a little bit of Urban Decay’s Backtalk (another Vice, comfort-matte lipstick) and dabbed on my lips. Worked really well, actually.
Here’s a photo of the lip color. What do you think of this shade? Let me know in the comments.

Natural Glow Party Look
It’s summertime and the living is easy. On Sunday, my work threw a fabulous White Hot Summer party with Cavallo Point Lodge in Sausalito, CA. Since people had to show up in their best summer whites, I decided to create a simple, natural glow look. Below is a photo from my snapchat. I didn’t get a close up of my eyeshadow, however, I plan on doing this look again, so I will update with a new photo then. Also, I recently added some ombré highlights, so I’m looking blonder and tanner. 🙂 This look is using primarily Too Faced products.

Face:
- Hangover Replenishing Face Primer by Too Faced. I am loving this primer. It hydrates my skin and smells amazing.
- Born This Way Foundation in Warm Nude by Too Faced. You know me; this is my go-to foundation.
- Bye Bye Under Eye concealer by it Cosmetics. Again, my go-to concealer. However, I did run out of it this morning. Onto the next! 😀
- Primed & Poreless Priming Powder by Too Faced. Use a brush to set your concealer, wherever you apply it.
- Cocoa Powder Foundation in Light/Medium by Too Faced. Use this as an all-over powder to set your liquid foundation. It gives you a more flawless, HD look.
- Blush Rush in Passion by Smashbox. Gives my cheeks a rosy look. Apply lightly.
- Candlelight Glow Highlighting Powder in Warm Glow by Too Faced. Apply above your blush on your cheeks. Option to apply on cupids bow and on the tip of your nose.
Eyes:
- Eyeshadow Primer Potion in Original by Urban Decay. Apply all over your lid and up to brow bone.
- Chocolate Bar Eyeshadow Palette by Too Faced. See below for colors and placement.
- Using an all over eyeshadow brush, apply White Chocolate on lid up to brow bone.
- Using a clean blending brush, apply Salted Caramel in the crease. Be sure to tap off excess shadow before applying. Start with little color and add more to deepen the color if necessary. Keep applying to the outer corner of your eye, to mid-eyelid.
- Using the same all over eyeshadow brush you used for White Chocolate, apply Marzipan on the center of your eyelid to the inner corner.
- If needed, apply more Salted Caramel in the crease with the blending brush used. To soften the crease, take a clean blending brush and blend it out.
- On brow bone, apply Champagne Truffle to highlight and line the bottom of your eyebrow.
- Apply Champagne Truffle on your inner corners to brighten your eyes a bit.
- 24/7 Waterline Eye Pencil in Legend (black) by Urban Decay. Running out of this, too, so I purchased a Too Faced one to see which looks better.
- Long Wear Gel Eyeliner in Black Ink by Bobbi Brown. I haven’t used a liquid eyeliner since purchasing this, but watched a MannyMUA video last night that uses a brush and liquid eyeliner. I feel like I have more control with a brush rather than what comes with the liquid eyeliner.
- They’re Real Mascara by Benefit Cosmetics. No need for falsies with this.
Lips:
- Lip Insurance Lip Primer with Matte Finish by Too Faced
- Perfect Lips Lip Pencil in Perfect/Neutral Spice by Too Faced
- Melted Matte Liquified Lipstick in Child Star by Too Faced. This has been my go-to matte lipstick as of late. It lasts all day and the color goes with everything.
Finish:
- All Nighter Setting Spray by Urban Decay. Love this stuff. Never leave the house without spraying some on.
Since this look consisted of neutrals and pinks, the melted matte lipstick really added some depth to the look. I will definitely be doing this look again (probably this weekend for a friend’s birthday party).
I’d love to see your favorite natural glow party looks for summer! Tag me on Instagram @blush.and.lipstick! 🙂
Work Party Makeup
This week, I’ve been representing the magazine I work for a lot, and tonight is no exception. We have a work-related function after working hours, so I thought I’d keep it professional, yet fun for the event tonight. Here’s the look and check out the details below the photos.


Face:
- Primed & Poreless pure primer by Too Faced
- Born This Way liquid foundation in warm nude by Too Faced (applied with a beauty blender)
- Bye Bye Under Eye concealer by it Cosmetics
- Primed & Poreless priming powder (translucent), this sets the foundation and gives an airbrushed look
- Smashbox Blush Rush in the color Passion
- Candlelight Glow highlighting powder in Rose Glow by Too Faced
Eyes:
- Eyeshadow primer potion by Urban Decay
- Naked 3 Eyeshadow Palette by Urban Decay
- On lid to brow bone: Strange
- On lid and crease (wet your eyeshadow brush first): Buzz
- On crease up to brow bone and a little on inner corners: Naked Lunch by MAC Cosmetics
- Blend from crease up to mix colors
- Bobbi Brown Gel Eyeliner in black ink
- They’re Real mascara by Benefit Cosmetics
Lips:
- Lip Insurance lip primer, matte finish by Too Faced
- Perfect Lips Long Lasting Liner in Perfect Nude by Too Faced
- Melted Matte Liquified Lipstick in Child Star by Too Faced
Finish:
- All Nighter Makeup Setting Spray by Urban Decay
I officially am in love with that Too Faced Candlelight Glow highlighting powder and will be using it every down from now on. Do you like this look? Let me know!
Professional Glam Look
Today I am heading back to my alma mater, San Francisco State University, to help judge magazine ideas for a contemporary magazines class (my full time job is the digital media manager for Marin Magazine in Sausalito, CA). That being said, I decided to do a full face of makeup today since I will be out representing the magazine. Why do I call it “professional glam”? Because the gold layer of eyeshadow has glitter galore in it. Subtle enough for the workplace, but glamorous enough to up your every day makeup game. I used a variety of products that I will list below. Here are a couple snaps of my look:


Face:
- Primed & Poreless pure primer by Too Faced
- Born This Way liquid foundation in warm nude by Too Faced (applied with a beauty blender)
- Bye Bye Under Eye concealer by it Cosmetics
- Primed & Poreless priming powder (translucent), this sets the foundation and gives an airbrushed look
- Smashbox Blush Rush in the color Passion
Eyes:
- Eyeshadow primer potion by Urban Decay
- Naked 3 Eyeshadow Palette by Urban Decay
- On lid: Limit
- On lid and crease (wet your eyeshadow brush first): Trick
- On crease up to brow bone and a little on inner corners: Naked Lunch by MAC Cosmetics
- Blend from crease up to mix colors
- Bobbi Brown Gel Eyeliner in black ink
- They’re Real mascara by Benefit Cosmetics
Lips:
- Lip Insurance lip primer, matte finish by Too Faced
- Perfect Lips Long Lasting Liner in Perfect Nude by Too Faced
- Melted Matte Liquified Lipstick in Child Star by Too Faced
Finish:
- All Nighter Makeup Setting Spray by Urban Decay
So that’s my look! I received my latest Too Faced order yesterday and will be writing a post about those products soon, as well as my before and after series with the solid beautycleanser I purchased from Sephora.
I hope you like this look!
Party Look Using (Mainly) Too Faced Products
On Saturday, my husband and I drove down to Santa Cruz for a friend’s going away party. Since we would be seeing people we hadn’t seen since our wedding last October and since I’d be meeting new people, I thought I’d create a new party look. If you remember, my last haul from Sephora included the Too Faced Boudoir Eyes eyeshadow palette, so I decided to give that a go. Here are two photos of my look: one showing everything, and the other, a close up of my shimmery eye shadow. Read below the photos to see how I blended the eye look.


Face:
- Primed & Poreless pure primer by Too Faced
- Born This Way liquid foundation in warm nude by Too Faced (applied with a beauty blender)
- Bye Bye Under Eye concealer by it Cosmetics
- Primed & Poreless priming powder (translucent), this sets the foundation and gives an airbrushed look
- Smashbox Blush Rush in the color Passion
Eyes:
- Eyeshadow primer potion by Urban Decay
- Boudoir Eyeshadow Palette by Too Faced
- On lid to brow: In the Buff
- On lid: mixed Satin Sheets and Lap Dance
- On brow: Satin Sheets (to highlight)
- On inner corner: Birthday Suit
- Blended everything up to brow bone
- Bobbi Brown Gel Eyeliner in black ink
- They’re Real mascara by Benefit Cosmetics (I don’t use fake lashes since mine are super long)
Lips:
- Lip Insurance lip primer, matte finish by Too Faced
- Perfect Lips Long Lasting Liner in Perfect Nude by Too Faced
- Melted Matte Liquified Lipstick in Queen B by Too Faced
Finish:
- All Nighter Makeup Setting Spray by Urban Decay
If you created a look using the Boudoir Eyes eyeshadow palette by Too Faced, let me know! Also, if you like this look (or don’t like it), leave a comment below.
